
Implementing a Challenging Product Configurator with 3D Parametric Models
We recently released the first production version of a web-based 3D configurator for KILO, a designer furniture manufacturer. We used our Salsita 3D Product Configurator Framework, an in-house SDK that makes implementing 3D configurators a breeze, but we still faced a few interesting challenges.
Table of Contents
We recently released the first production version of a web-based 3D configurator for KILO, a Netherlands-based designer furniture manufacturer. We made use of our Salsita 3D Configurator, an in-house SDK that makes implementing new 3D configurators a breeze. While it helped us tremendously, we still faced a few interesting challenges.
Request Demo
Submit this form and we will contact you back to schedule the 3D configurator demo.
Parametric Model
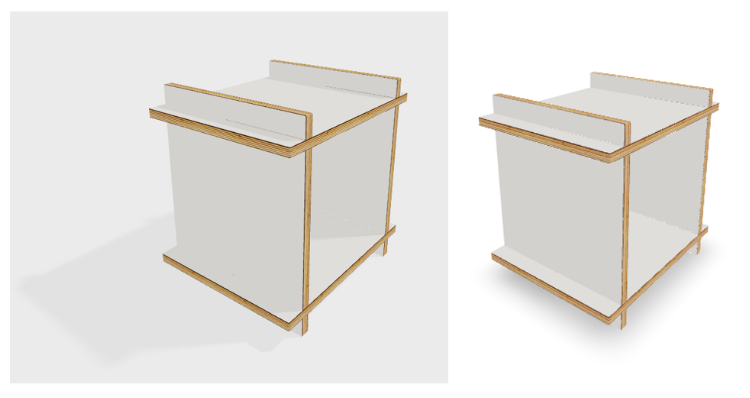
The biggest challenge was enabling full parametric modeling. KILO's manufacturing process enables them to offer furniture with custom dimensions. However, until now their online customers have been limited to standard size products. To address this, we added dimension sliders to the configurator. These let the user choose the exact height, width and depth of the furniture, with changes immediately applied to the 3D visualization of the product.
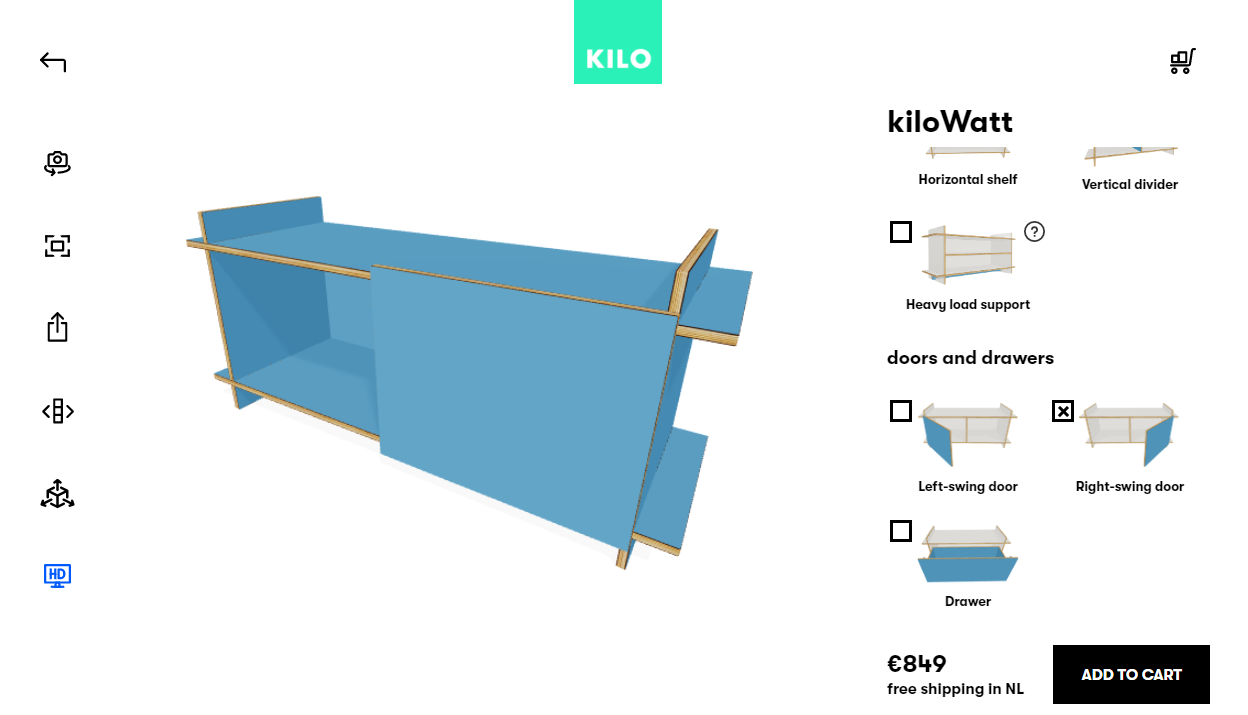
In order to achieve this, we needed to use so-called parametric 3D models. Unlike normal 3D models, their shape is not fixed, but depends on various input parameters: dimensions, number of shelves, side on which the doors are mounted, etc.
Parametric models are often specified using complicated modeling languages like Grasshopper. Unfortunately, they lack a JavaScript-based interpreter that could quickly generate the model when input parameters change. We also considered OpenJSCAD and a few other alternatives, but they all proved to be overly complicated, either in the way we would need to integrate them into the configurator or in the language they use to design new models.
In the end we decided to rely directly on Three.js, a well-known 3D engine for WebGL that is already heavily used by our configurator SDK. We split the model into individual parts, drew a 2D shape of each part and then extruded it to 3D using Three.js. The final step was to assemble the individual parts to form the actual piece of furniture. We used react-three-fiber as a reactive way of managing the Three.js scene, making the last two steps extremely easy. Basically we just had to provide the 2D shape, position and rotation of the part, and the model is updated each time any of them change.
This approach meant we needed a way to describe the 2D shapes. KILO’s furniture uses simple and clean shapes, mainly straight lines with a few rounded corners. Having this very limited set of building blocks led to a simple JavaScript-based “domain specific language” (DSL) through which we can model any KILO part. In a nutshell, the DSL allows you to specify corners of a shape, optionally making them rounded by providing a radius. This, accompanied by a generic arc element for round furniture, is sufficient to cover all of KILO’s products.
The dynamicity of the model, i.e., respecting input parameters, is left to JavaScript itself. Instead of specifying fixed coordinates in the DSL, you just use variables like height and width along with JavaScript calculations. Various techniques known to all JavaScript developers can be easily applied on the DSL code to make it more modular, readable, and reusable. All the model generation logic for a single product is encapsulated in a single factory function.
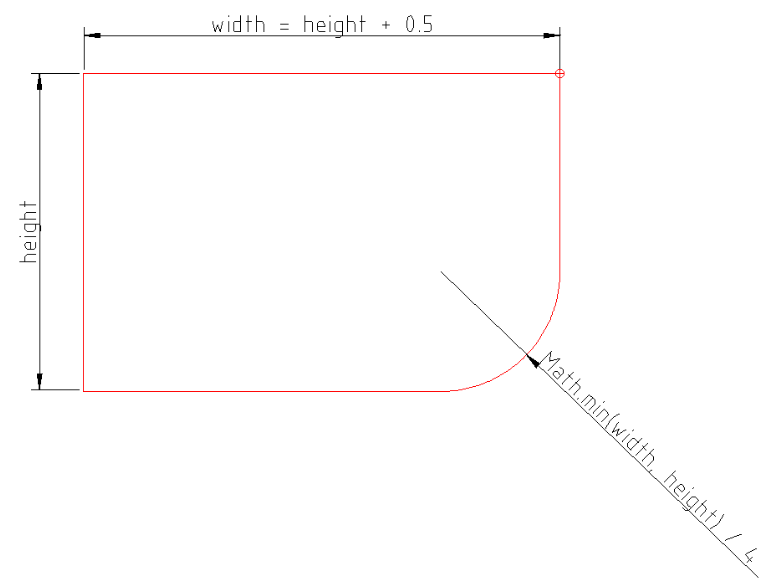
The following snippet shows a rectangle with a rounded corner that is dynamically constructed based on the height variable:
const height = 1
const width = height + 0.5

const shape: ShapeElement[] = [
  { corner: [0, 0] },
  {
    corner: [width, 0],
    radius: Math.min(width / height) / 4
  },
  { corner: [width, height] },
  { corner: [0, height] }
]
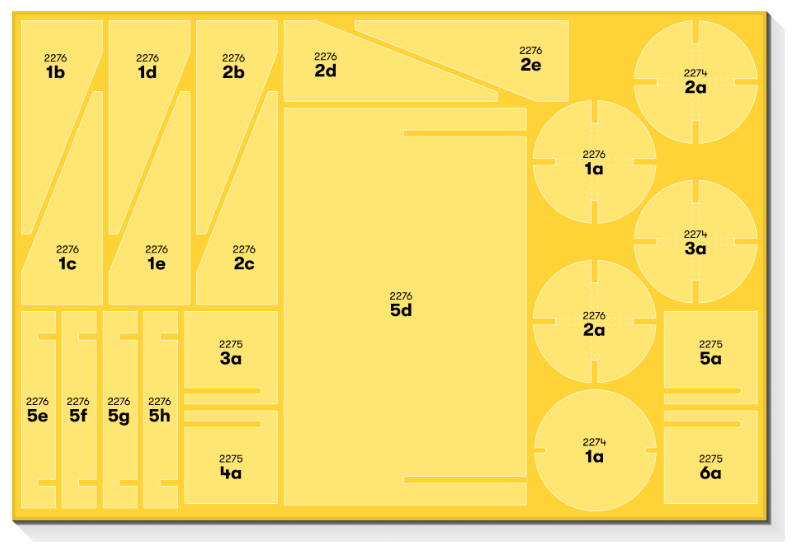
We use a set of rather trivial routines to “draw” definitions generated by the above factory function into the target space, be it a 2D shape used for 3D extrusion, an SVG image, or later an AutoCAD DXF file. The DSL also allows for simple and highly accurate calculation of area and perimeter length, which is important for showing the customer the correct price.
Everything just mentioned is written in TypeScript and can run both in Node.js on the server and in the browser. This makes it easy to dynamically update the 3D model in near real time when the user adjusts dimension sliders and to allow processing, such as price calculation, on the server. In further versions, the DSL will also power our production dashboard with order grouping, automatic nesting of parts, and DXF export of fully-nested plates.
Site Integration
Another challenge was integration into an existing WordPress site using WooCommerce for commerce features. Although we considered using an iframe, in the end we decided on seamless integration using a custom WordPress plugin. The plugin injects the configurator's React application right into the main site.
To reduce coupling between the configurator and the WordPress site, we host both the configurator frontend and the API on a separate server. Our WordPress plugin simply pulls the frontend bundle from our server whenever the user lands on a product page.
Fortunately the configurator SDK was well-designed and didn’t get in our way when we were integrating the configurator. All styles are properly scoped to target components (we are using the emotion library), so we just needed to define a root element within the WordPress plugin and then bootstrap the whole configurator application within that element.
We’re using Create React App to generate the production builds. The code is bundled by Webpack into files suffixed with random version hashes. This is the most reliable way to make the browser refetch the application files when a new version is deployed. Unfortunately this means that there is no way for the plugin to link the correct files into WordPress without knowing the hashes ahead of time.
We solved this by pushing an updated version of the plugin to the WordPress site upon each deployment to our server. As a beneficial side effect, we can deploy plugin updates together with the rest of the application without any additional effort. All of this is orchestrated by our CI/CD pipeline.
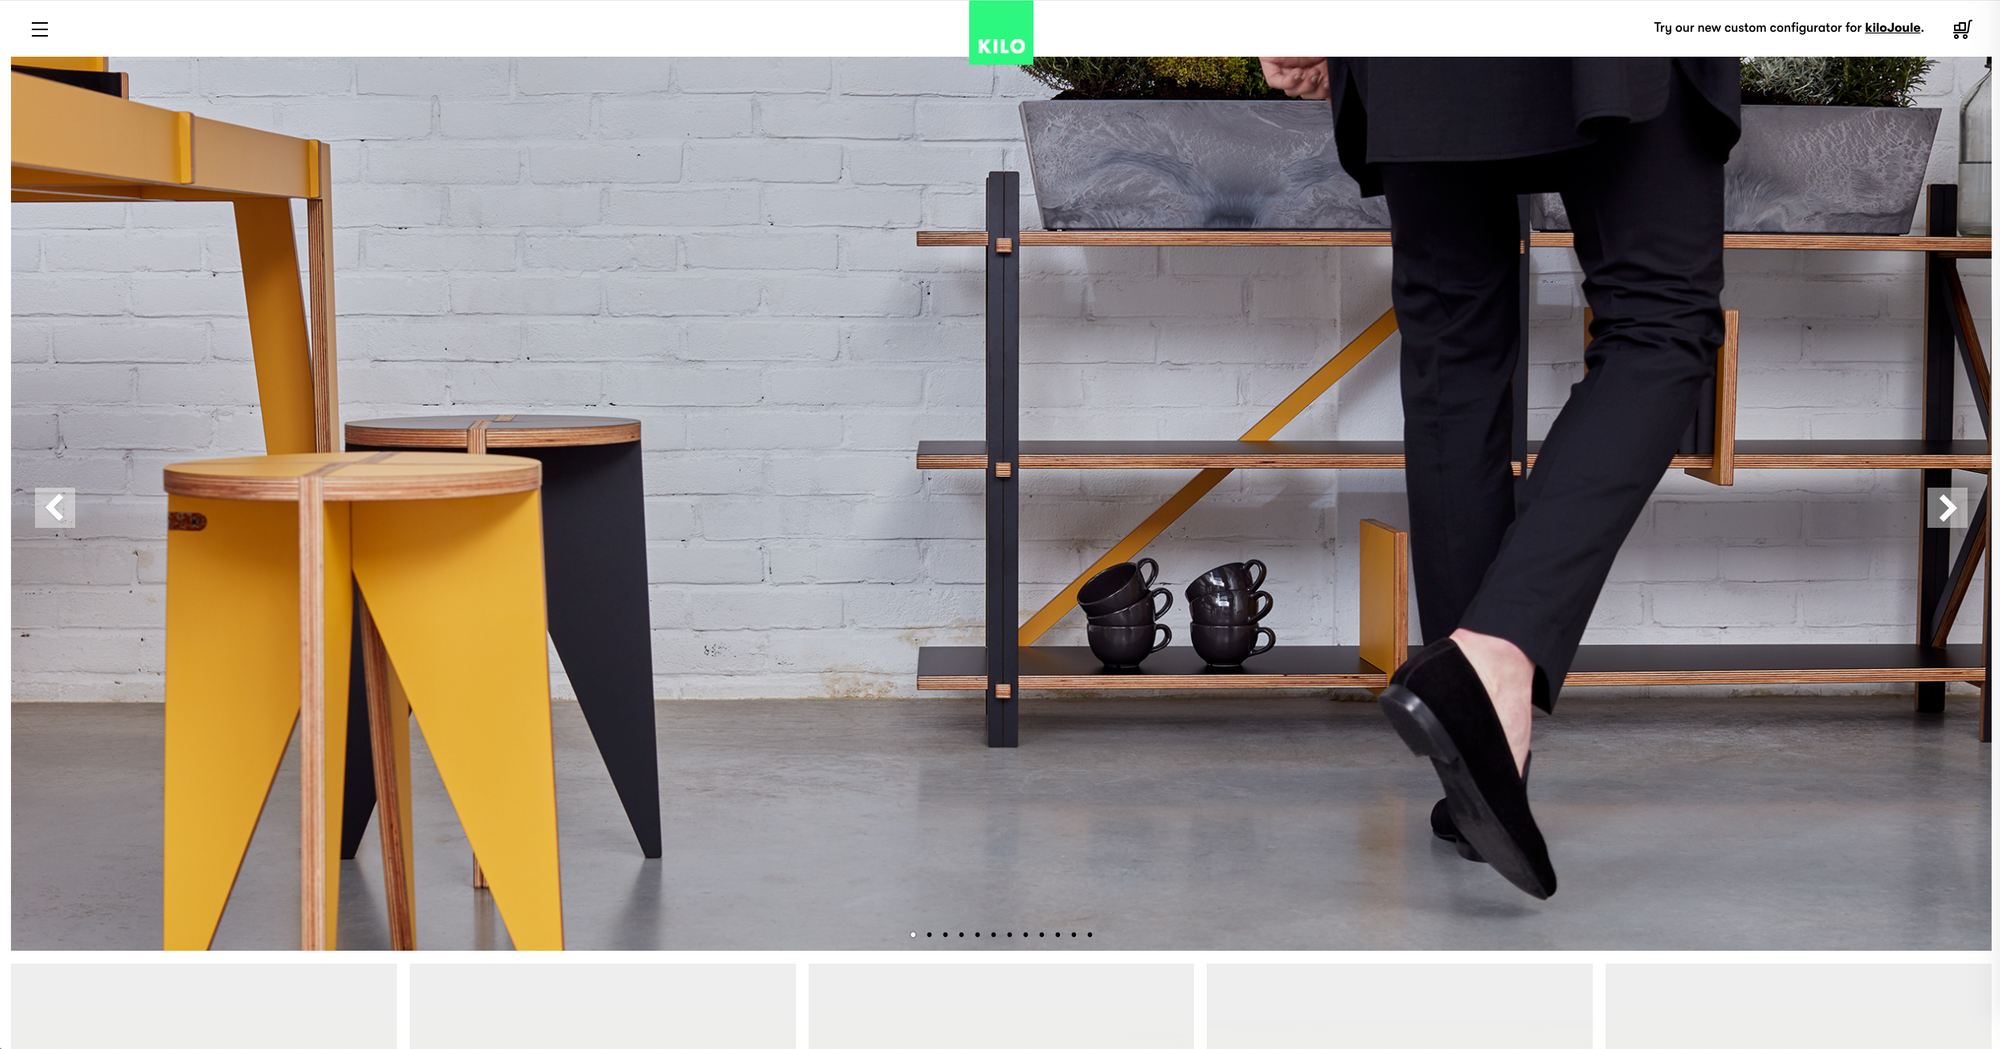
Apart from adding the configurator to the existing site, we also tackled several UX issues and improved the UI in general. A great example is the home page, where the stylish photo carousel at the top takes center stage. The focus on high-resolution pictures of KILO’s stunning designer furniture is a powerful way to spark customer interest.
Everything has its limits though. Because the original carousel was taking up the full height of the browser window, it wasn't obvious that the user could scroll down to see content below the carousel. Yet the most important content was hidden right below the bottom edge of the user’s browser: tiles with product images from the entire portfolio. We slightly reduced the height of the carousel so that the top of the product tiles is always visible. This simple hint is enough to make the user scroll down.
KILO uses a customized WordPress/WooCommerce theme to create a unique look-and-feel truly and to follow the high design standards of the company. To make our impact on the site easily traceable and reversible, we have created our own child theme based on the existing theme. This allows us to override certain aspects of the site while leaving the rest intact. The child theme is simply a directory within the WordPress site, which is pushed as part of our CI/CD deployment as outlined above.
Look and Performance
In the beginning the client expressed some doubts about using 3D models. The client said that 3D models don't usually look realistic enough and have a cartoonish look that makes a negative impression on the customer. They said that they would prefer a simplified look. Seeing the simple shapes of KILO’s furniture, however, we were confident that we could make it look good. The client was convinced by the early previews we made, so we ended up pursuing the “realistic model” idea.
We received a physical sample of the laminated plywood boards that KILO uses, captured several photos of the edge, and turned those into a realistic texture. Surprisingly, the best tool for capturing the photos was a mid-tier smartphone, due to its fixed (and nearly infinite) depth of field. We also took a close look at the surface layer and found an appropriate “orange peel” bump map. This map turns a flat artificial looking surface into a much more “tangible” material with a realistic texture.
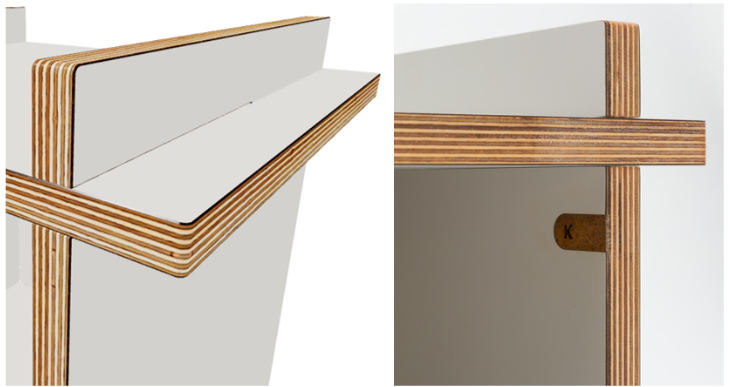
Another factor that greatly increases the realism of a 3D model is lighting. It proved to be nearly impossible to find a lighting setup that casts realistic shadows while accurately displaying material colors. Slight improvements in one direction often had a disastrous effect on the other one.
In the end we decided to define the lighting of the scene to create the appropriate shadows, reflections, and other effects. Then we compensated for the imperfect colors by slightly changing their actual value. For example, the black color was no longer pure RAL black (RGB #000000); we had to make it a bit lighter so it didn't end up looking like a light-consuming black hole. Other colors needed to be desaturated to make them look less cartoonish.
Even with the simple geometries of KILO’s parts, we started facing performance issues as we moved towards more and more realistic shadows. Coincidentally, a GPU detection feature was just introduced into a supporting library we had already been using. Thanks to that we were able to display realistic shadows on high-end GPUs and fallback to so-called “contact shadows”—which are much less computationally expensive—on low-end devices. A contact shadow is simply a blurry spot underneath the object, something one would get if the scene had hundreds of lights coming from all directions. There are differing opinions about the merits of realistic vs. contact shadows. I personally like the contact shadows better as they keep me focused on the object itself rather than on the shadows.
What We Learned
The KILO project is proof that our 3D Configurator SDK can be easily extended for use cases not anticipated during the initial design. There was no need for any major rewrite of the SDK (not even because of the parametric models), and the changes we had to do mostly involved improving the general architecture to make it more flexible. And thanks to our SDK we were able to prepare the MVP in just six weeks.
Request Demo
Submit this form and we will contact you back to schedule the 3D configurator demo.
We also proved that we can successfully integrate the configurator into eCommerce solutions running on legacy monolithic platforms such as WordPress and WooCommerce, even though the process wasn’t nearly as smooth as it would have been if we were integrating it with modern platforms like Shopify or even better a MACH-compatible solution like commercetools.


