
Transforming an ordinary application into a Progressive Web Application (PWA)
Converting an ordinary application into a basic Progressive Web Application is not as complex as it might seem at first glance.
Table of Contents
Converting an ordinary application into a basic Progressive Web Application is not as complex as it might seem at first glance.
One approach relies on a detailed checklist to ensure that all necessary features are included. Google, who invented the PWA concept back in 2015, provides a list of everything that makes an application progressive.
The listed points are quite numerous. However, what is essential to develop a baseline PWA may be summarized as follows:
- The site is served over HTTPS
- Pages are responsive on mobile devices
- A manifest is included with metadata about the app
- Every page has its own URL and can be loaded in offline mode (using a service worker)
Putting Progressive into practice: Salsita Meetup App
The Salsita Meetup App is an ordinary web application that we would like to turn into a PWA.
This App is already responsive and hence usable on mobile devices. Available sections include the meetup program and floorplan for Salsita's office, both of which are static pages, whereas the refreshment section involves communication with a remote API.

Auditing with Lighthouse PWA Analysis Tool
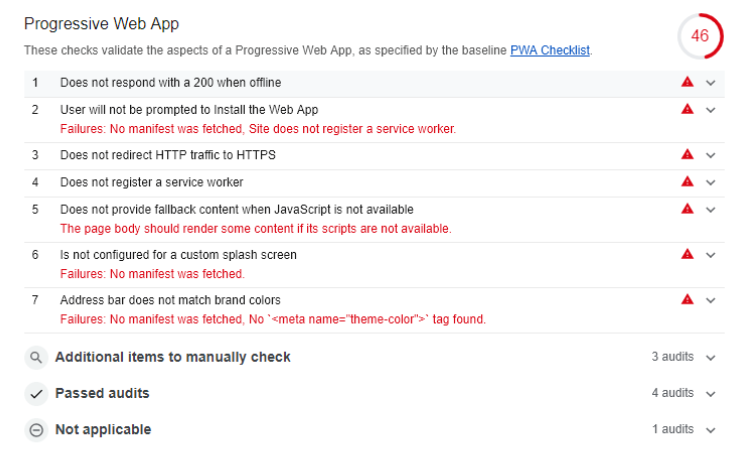
How do we determine if the PWA aspects are fully functional?

The Lighthouse tool is available inside Chrome DevTools. Running it when building a PWA provides an overview of which features the app currently supports and which are missing.
Once you have provided Lighthouse with a URL for the PWA, the tool runs a series of checks against the page. It then produces a detailed report that includes a list of scores for each check. The failing checks indicate areas that need to be addressed to create a valid PWA.
Describing your progressive web app with a web manifest file
After running Lighthouse PWA Analysis Tool, you may have noticed that a few checks refer to the Web App Manifest.
When we run the Lighthouse PWA Analysis Tool on the Salsita Meetup App, the audit initially reports a few failures. This is to be expected since the app does not yet have a manifest.
The Web App Manifest is nothing more than a JSON file containing metadata about the site. The main task of the file is to provide the browser with two essential pieces of information:
- What should the application look like?
- How should the application behave once installed?
Chrome requires this file to display the "Add to Home Screen" prompt. If the manifest has not been included, the user can still install the app using the "Add to Home Screen" option in the browser menu.
A typical manifest file includes the following information:
- App name
- Icons
- Colors
- Constraints (such as device orientation, e.g. if you have optimized your app to run in portrait mode)
The file can be handwritten or generated automatically using one of a number of tools available on the web. The tool used to generate the file for the Salsita Meetup App is the RealFaviconGenerator, which also helps you to generate appropriate icons for the different target platforms.
Usage is straightforward:
- Specify the app's name
- Select the source for the icons (256px is recommended and one of the Lighthouse checks requires 512px for a custom Android splash screen).
- Tweak the settings to tailor the appearance of the icons.
The tool itself provides practical information to optimize the icons, including a preview of how they will look on the various target systems.
Once the settings are configured to your satisfaction, the icons and manifest can be generated. The HTML code can be copied and pasted into the app's HTML start page.
{
  "name": "Meet Up",
  "short_name": "Meet Up",
  "scope": "/pwa/",
  "start_url": "/pwa/",
  "icons": [
    {
      "src": "android-chrome-192x192.png",
      "sizes": "192x192",
      "type": "image/png"
    },
    {
      "src": "apple-touch-icon.png",
      "sizes": "180x180",
      "type": "image/png"
    },
    {
      "src": "mstile-150x150.png",
      "sizes": "150x150",
      "type": "image/png"
    },
    {
      "src": "salsita-logo.png",
      "sizes": "512x512",
      "type": "image/png"
    }
  ],
  "theme_color": "#bc221d",
  "background_color": "#bc221d",
  "display": "standalone"
}
Once the app is rebuilt, all the favicons are visible. A new Lighthouse audit will now return improved scores.

What comes next?
At this stage, the PWA still lacks offline capabilities, as evidenced by the Lighthouse audit report:

To enable offline operation, we need to create a Service Worker.
Making your PWA work offline with Service Workers
A Service Worker is a core PWA feature used for resource caching and push notifications.
It is a JavaScript Web Worker. This means that it runs separately from the web page in the background with its own lifecycle. The Service Worker cannot interact directly with your user interface directly.
It acts as a Programmable Network Proxy. This means that it can intercept every network request made by the application. It can then either serve a response from the cache or let the request continue as usual and potentially cache the response. Handling the request cache is not the only role of the Service Worker. It also lets the app subscribe to push events and display push notifications.
It will also allow use of the background sync API once this specification has been finalized by the relevant standards committee.
Do all browsers support the Service Worker API?
It appears that all major browsers now support it with the exception of IE and Opera Mini.

Understanding the Service Worker Lifecycle
The Service Worker lifecycle runs separately from your webpage.
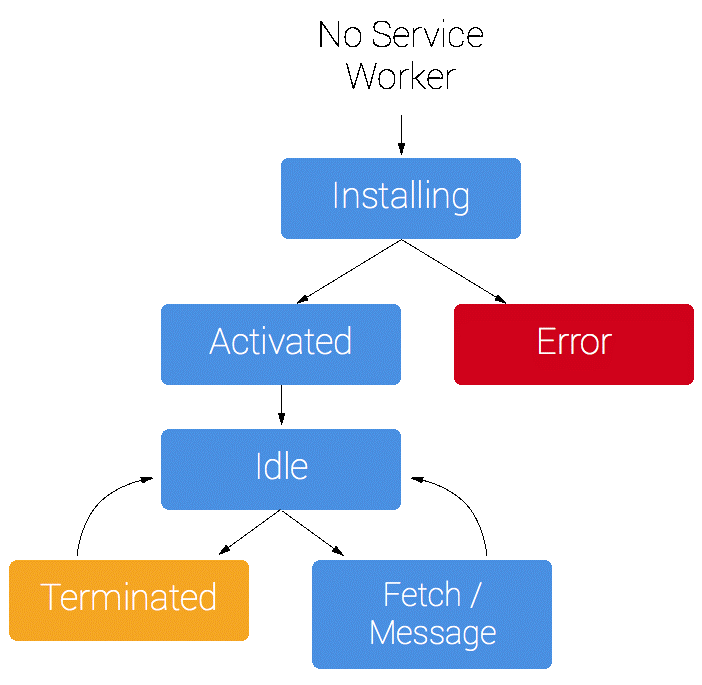
As illustrated by the Service Worker lifecycle, it is intended to:
- Enable offline operation
- Allow a new service worker to be installed without disrupting the current one
- Ensure that an in-scope page is controlled by the same service worker (or no service worker) throughout
- Ensure that there is only one version of your site running at once
This last point deserves further clarification. Remember that users can load your app into one browser tab and later into a second. This could result in two versions of the site running at the same time. If the app uses some kind of external storage, for example, this might lead to data loss or other bad consequences. By fetching the app through a Service Worker, you ensure that the same version is running everywhere.
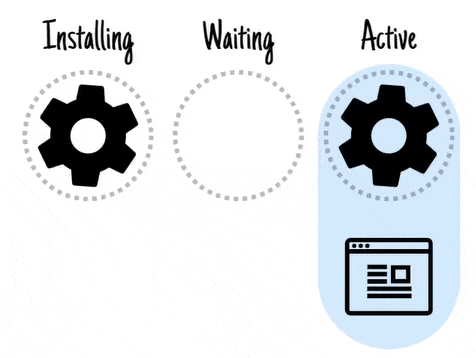
Installing Service Worker
A service worker goes through three main states:
- Registration
- Installation
- Activation
Installation is triggered by registering the Service Worker for the first time in your JavaScript code. The Service Worker doesn’t receive any events until the installation has finished. Once installed, it enters the Active state.
By design, requests only go through the Service Worker if the original page request went through the Service Worker as well. This means that if the page was loaded before the Service Worker installation has finished, you will need to refresh the page for it to function correctly.
Updating the Service Worker
A Service Worker can be registered at any time after the application loads. If one has been registered previously, it is up to the browser to decide whether to update it or keep using the current version.
How does the browser perform this analysis?
It is enough that the new Service Worker code differs from the current one by a single byte. If so, it will be updated.
If the attempted update fails, the current Service Worker keeps running. On the other hand, if the update succeeds, the new Service Worker enters a waiting state until the current Service Worker is no longer controlling any instances of the app. This happens once the user closes any open tabs running the app.
You can override this behavior and force the Service Worker to update immediately by calling self.skipwaiting.
Once the current Service Worker has been fully replaced, you can upgrade or delete the old caches.
A few notes about Service Workers – Practical Coding
The Service Workers are heavily based on promises. Most of the Service Worker example code found on the web is made up of long promise chains:
self.addEventListener('fetch', function(event) {
  event.respondWith(
    caches.match(event.request)
      .then(function(response) {
        if (response) {
          return response;
        }
        return fetch(event.request);
      });
  );
});
This kind of code is difficult to read. However, by using async/await you can simplify your code as shown:
self.addEventListener('fetch', async function(event) {
  let response = await caches.match(event.request);
  if (!response) {
    reponse = await fetch(event.request);
  }
  return response;
});
Below is the complete Service Worker code:
const version = 1;
const cacheName = `salsita-meetup-cache-v${version}`;

self.addEventListener('install', async function(event) {
  console.log('[Service Worker]: Installing...');
  event.waitUntil((async () => {
    try {
      const cache = await caches.open(cacheName);
      await cache.addAll([
        'index.html',
        'es2015-polyfills.js',
        'main.js',
        'polyfills.js',
        'runtime.js',
        'styles.css',
        'assets/img/bell.svg',
        'assets/img/do-not-go.jpg',
        'assets/img/assets/img/Matt.jpg',
        'assets/img/office-plan.svg',
        'assets/img/running-white.gif',
        'assets/img/salsita-logo.jpg',
        'assets/img/spoon-knife.svg',
        'assets/img/sprite.svg',
        'assets/img/waiter_run.gif',
      ]);
      console.log('[Service Worker]: Precaching finished. Installation successful');
    } catch (err) {
      console.error('[Service Worker]: Installation failed because of', err);
      throw err;
    }
  })());
});

self.addEventListener('fetch', async function(event) {
  console.log('[Service Worker]: Fetch event -> received', event.request.method, 'request to', event.request.url);
  event.respondWith((async () => {
    let response = await caches.match(event.request);
    if (!response) {
      console.log('[Service Worker]: Cache miss, sending request through to');
      response = await fetch(event.request);
      if (!response || response.status !== 200 || response.type !== 'basic' || event.request.method !== 'GET') {
        console.log('[Service Worker]: Done, but the response is not cacheable');
      } else {
        console.log('[Service Worker]: Done, caching the response');

        const responseToCache = response.clone();
        const cache = await caches.open(cacheName);
        cache.put(event.request, responseToCache);
      }
    } else {
      console.log('[Service Worker]: Served from cache');
    }
    return response;
  })());
});

self.addEventListener('push', async function(event) {
  console.log('[Service Worker]: Push received with the following data', event.data.text());

  const title = 'Meet Up App';
  const options = {
    body: event.data.text(),
    icon: 'assets/img/bell.svg',
    badge: 'assets/img/spoon-knife.svg',
  };
  event.waitUntil(self.registration.showNotification(title, options));
});
Ending the "Progressive" Process
As soon as the Service worker installation completes and enters the Active state, requests will pass through it and the app will work offline.

The Service Worker has now been installed and it has pre-cached the resources. At this stage, to make the changes effective and give the Service Worker the capability to control the application, you need to reload or call 'clients.claim()' to override the default behavior.
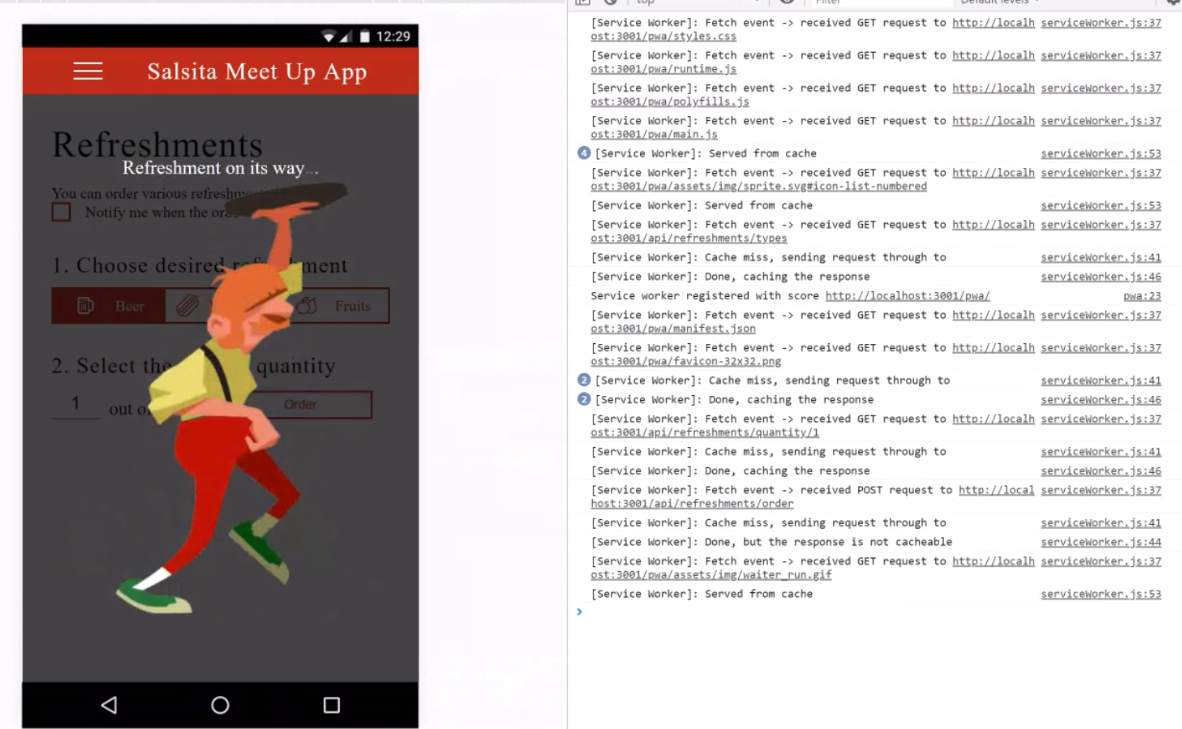
The PWA is now able to run offline.
After running the Lighthouse PWA Analysis Tool again, you can compare the latest scores with the previous reports:

The PWA is now fully functional.
Conclusion
In this article, we have shared a concrete example of how to convert an ordinary application into a PWA. We outline the step-by-step process to set up a basic PWA and explained how to use a few tools and techniques to your advantage.
Let’s recap the main steps of the process:
- Start with a responsive mobile application (in our example: Salsita Meetup App)
- Use Lighthouse to audit the status of your PWA at each stage
- Add a Web App Manifest
- Enable offline capabilities and push notifications through a Service Worker
In conclusion, the whole process is not as complicated as it might seem. Moreover, you can rely on a few practical tools to simplify the process and ensure that you follow each step correctly.
The next step is in your hands. Try to transform your web application into a PWA and share your experiences with us!
Here's the repository on Github: pwa-cordova-meetup-app


